ShopDreamUp AI ArtDreamUp
Deviation Actions


Suggested Deviants


Suggested Collections


You Might Like…


Featured in Groups


Description
This time we're going to make a nice space-like background and get a little basic practice on using multiple layers, filters, layers masks, and colorization.
Open up Gimp and create a new file, not too big since it will tile, but make sure you have enough room. It could be 300x300 or a similar size.
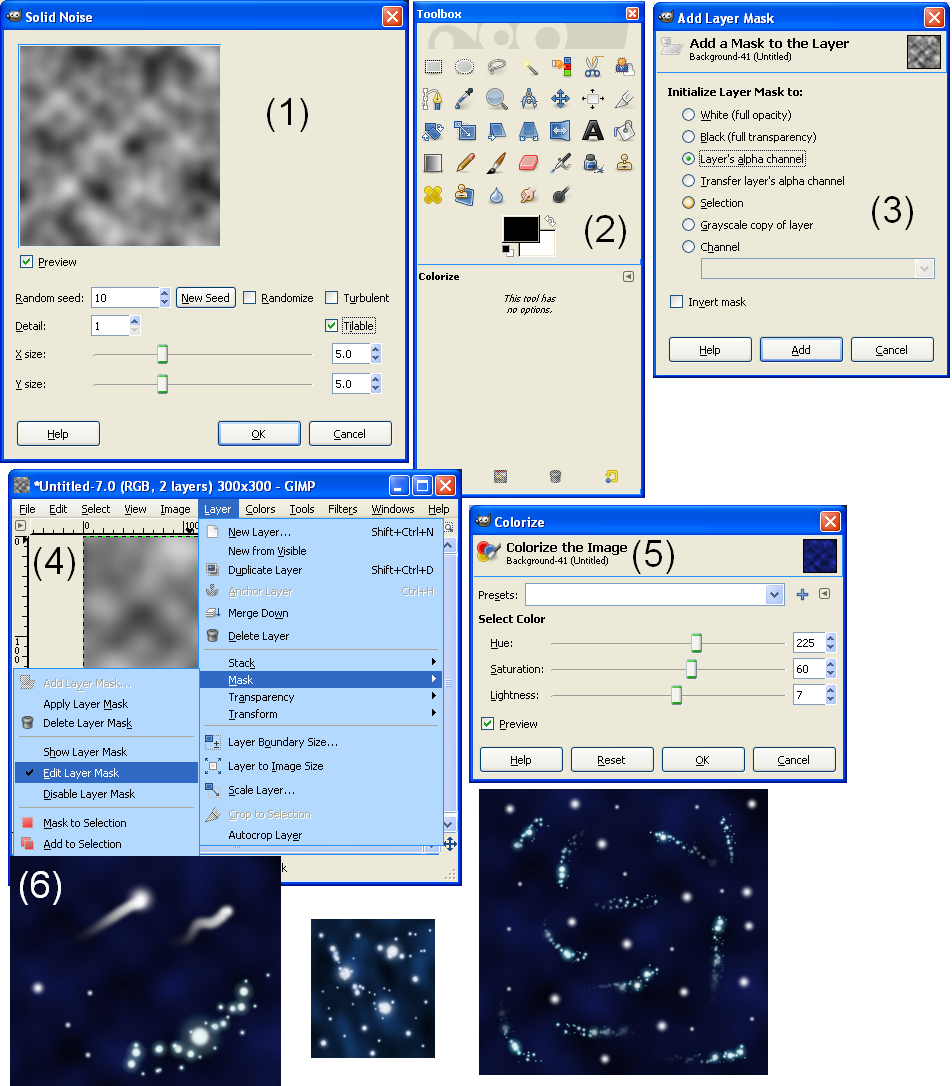
(1) On the top menu, under "Filters", go to "Renders", "Clouds" and "Difference Clouds". Make sure the "Tilable" checkbox is checked. I'm leaving the "Detail" setting on 1 so it's nice and blurry. You can experiment with the "Random Seed" and the "X size" and "Y size" until you find one that you like. Now click "OK" and the empty file is filled with the selected pattern.
(2) Next up we're going to make a new layer, make sure the color black is selected; it is the foreground by default. Go to "Layer" and "New Layer" from the top menu. Under "Layer Fill Type" select the foreground, if its black, or you can just use the Bucket to paint this layer black. If you don't see the layers window, open it with Ctrl+L and make sure the black layers is under the cloud layer, you can move it by dragging and dropping.
(3) Now to add the layer mask, make sure the clouds layer is selected on the layer window and on the top menu go to "Layer", "Mask" and "Add Layer Mask". You can initially choose "White (full opacity)" from the options. Don't check the "invert mask" box. Now click Add and you will see no immediate changes.
(4) Make sure you are editing the layer mask. To check, you can go to "Layer" and "Mask" and see that "Edit Layer Mask" has a little check next to it. Now select the Bucket Fill Tool, it's that bucket on the Toolbox on picture 2, the third one down on the last column to the right. The opacity should be at 100 and by default "FG color fill" is selected, the "Mode" is normal. Click on the color above the color to change it and turn it into a dark gray, now use the bucked on the picture and you'll see that it is the layer mask that receives the color. The darker the gray, the more transparent it becomes. You can experiment with different shades of gray until you find one that you like.
(5) Next up we're going to colorize the clouds; they are nearing their final appearance now. First we need to select the clouds as the layer mask was selected from the previous step. Just go to "Layer", "Mask" and remove the check next to "Edit Layer Mask". Now click on "Colors" on the top menu and "Colorize". As you change the hue, the color of the clouds will change. The saturation makes the colors bright or dull and the lightness controls how light or dark the picture is. Experiment with them until you find what you like. I'm going for a space-like black background with just a hint of blue, but you can make something different with this same technique if you prefer.
(6) Let's add the final layer, just like before click on "Layer" and "New Layer" but this time it will be a "Transparency" and it will go on top of the other two layers. Make sure the new transparent layer is selected and choose the Paintbrush tool, it's on the forth row from the top, the third tool from the left on picture two. Select the desired color and click on the preview next to "Brush" on the Toolbox. You'll get the list of brushes you have there. To add stars you can select circles of different sizes or you could use the Sparks brush for some nice effects. If you want to use Sparks but don't want them to be yellow, you can just colorize this layer with the same process we learned before. This is why everything is on a separate layer, to make it easy to edit each element. Don't go over the edge of the picture so the tiling doesn't get messed up!
A neat little trick to make a shooting star is to select the "Circle Fuzzy" brush and check the "Fade out" box. For an extra fade out effect you can also check "use color from gradient" box. You can change the colors on the gradient by selecting different FG and BG colors as you would normally select colors. One of those colors should be the same as the background color of the below layer. I'm selecting white and black. On the gradient make sure the color that's different from the background is on the left, if not, check the box next to it with the arrows. Now see what happens when you use the brush, you get the star at first, then its tail fading behind it. You can use the regular fuzzy circle in a slightly bigger size over the star to make it brighter. I copy and pasted a few pieces of backgrounds I've made.
Open up Gimp and create a new file, not too big since it will tile, but make sure you have enough room. It could be 300x300 or a similar size.
(1) On the top menu, under "Filters", go to "Renders", "Clouds" and "Difference Clouds". Make sure the "Tilable" checkbox is checked. I'm leaving the "Detail" setting on 1 so it's nice and blurry. You can experiment with the "Random Seed" and the "X size" and "Y size" until you find one that you like. Now click "OK" and the empty file is filled with the selected pattern.
(2) Next up we're going to make a new layer, make sure the color black is selected; it is the foreground by default. Go to "Layer" and "New Layer" from the top menu. Under "Layer Fill Type" select the foreground, if its black, or you can just use the Bucket to paint this layer black. If you don't see the layers window, open it with Ctrl+L and make sure the black layers is under the cloud layer, you can move it by dragging and dropping.
(3) Now to add the layer mask, make sure the clouds layer is selected on the layer window and on the top menu go to "Layer", "Mask" and "Add Layer Mask". You can initially choose "White (full opacity)" from the options. Don't check the "invert mask" box. Now click Add and you will see no immediate changes.
(4) Make sure you are editing the layer mask. To check, you can go to "Layer" and "Mask" and see that "Edit Layer Mask" has a little check next to it. Now select the Bucket Fill Tool, it's that bucket on the Toolbox on picture 2, the third one down on the last column to the right. The opacity should be at 100 and by default "FG color fill" is selected, the "Mode" is normal. Click on the color above the color to change it and turn it into a dark gray, now use the bucked on the picture and you'll see that it is the layer mask that receives the color. The darker the gray, the more transparent it becomes. You can experiment with different shades of gray until you find one that you like.
(5) Next up we're going to colorize the clouds; they are nearing their final appearance now. First we need to select the clouds as the layer mask was selected from the previous step. Just go to "Layer", "Mask" and remove the check next to "Edit Layer Mask". Now click on "Colors" on the top menu and "Colorize". As you change the hue, the color of the clouds will change. The saturation makes the colors bright or dull and the lightness controls how light or dark the picture is. Experiment with them until you find what you like. I'm going for a space-like black background with just a hint of blue, but you can make something different with this same technique if you prefer.
(6) Let's add the final layer, just like before click on "Layer" and "New Layer" but this time it will be a "Transparency" and it will go on top of the other two layers. Make sure the new transparent layer is selected and choose the Paintbrush tool, it's on the forth row from the top, the third tool from the left on picture two. Select the desired color and click on the preview next to "Brush" on the Toolbox. You'll get the list of brushes you have there. To add stars you can select circles of different sizes or you could use the Sparks brush for some nice effects. If you want to use Sparks but don't want them to be yellow, you can just colorize this layer with the same process we learned before. This is why everything is on a separate layer, to make it easy to edit each element. Don't go over the edge of the picture so the tiling doesn't get messed up!
A neat little trick to make a shooting star is to select the "Circle Fuzzy" brush and check the "Fade out" box. For an extra fade out effect you can also check "use color from gradient" box. You can change the colors on the gradient by selecting different FG and BG colors as you would normally select colors. One of those colors should be the same as the background color of the below layer. I'm selecting white and black. On the gradient make sure the color that's different from the background is on the left, if not, check the box next to it with the arrows. Now see what happens when you use the brush, you get the star at first, then its tail fading behind it. You can use the regular fuzzy circle in a slightly bigger size over the star to make it brighter. I copy and pasted a few pieces of backgrounds I've made.
Image size
952x1086px 248.34 KB
© 2010 - 2024 MikariStar
Comments8
Join the community to add your comment. Already a deviant? Log In
superbe ^^